
Securing Your Domain: A Deep Dive into Implementing DNSSEC with Amazon Route 53
From asymmetric KMS keys to the Chain of Trust—here is your step-by-step guide to preventing DNS spoofing.

Have you ever wondered how your browser really knows it’s talking to your bank and not an imposter redirecting traffic to a malicious server? While SSL/TLS encrypts the conversation, DNSSEC (Domain Name System Security Extensions) ensures you knocked on the right door in the first place.
For a long time, implementing DNSSEC was a headache reserved for hardcore sysadmins. It involved manual key rollovers, complex BIND configurations, and a lot of anxiety.
Today, we are going to walk through how to implement this using Amazon Route 53. As we analyze the architecture, we will see how AWS abstracts away the messy parts (like ZSK rotation) while giving you full control over the security posture via AWS KMS.
Let’s dive in.
The “Why”: The Problem with Standard DNS
Standard DNS is like sending a postcard. You ask “Where is https://www.google.com/search?q=google.com?” and a server replies “1.2.3.4.” But standard DNS doesn’t have a mechanism to verify who sent that reply. A “Man-in-the-Middle” could intercept your request and lie to you, sending you to a phishing site.
DNSSEC fixes this by creating a Chain of Trust. It digitally signs DNS records. If the signature doesn’t match, the resolver drops the packet. It’s that simple, and that critical.
The Architecture: How Route 53 Handles the Heavy Lifting
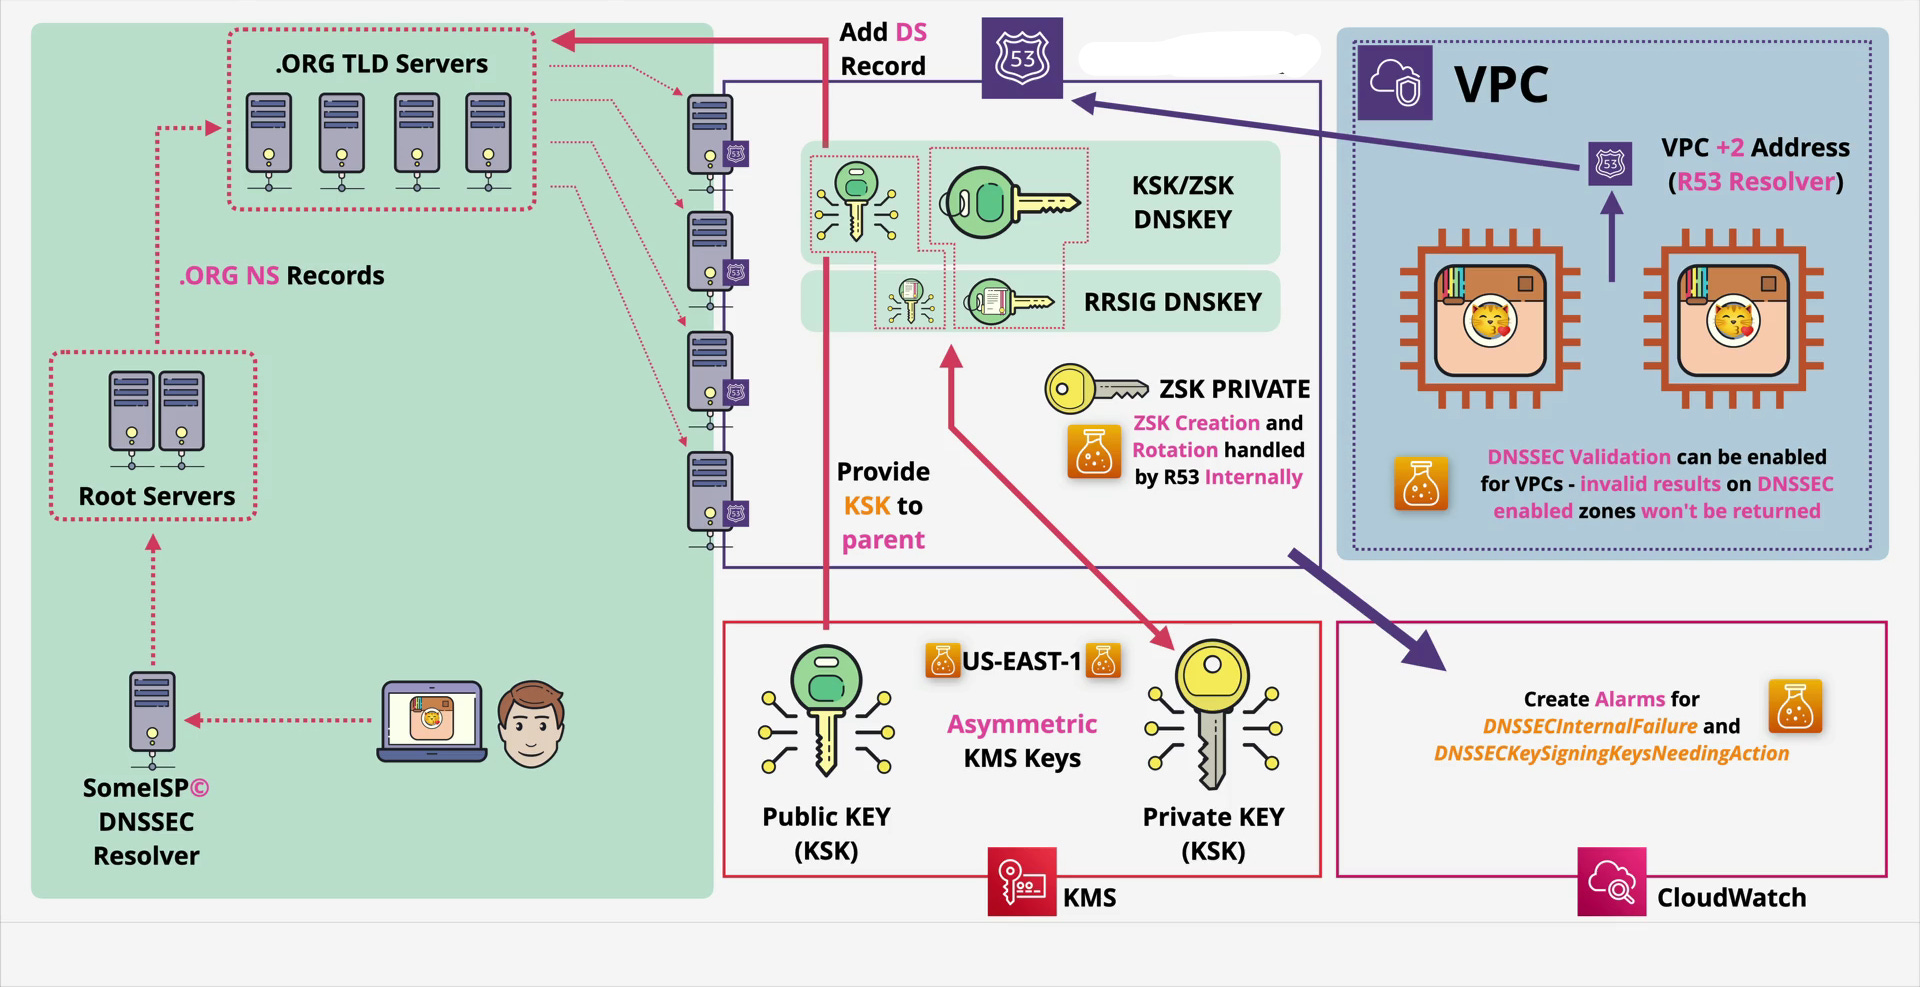
Before we click any buttons, let’s look at the architecture . Implementing DNSSEC on AWS involves three main players:
Route 53 (The Manager): Holds your zone files and handles the signing.
AWS KMS (The Vault): Stores the Key Signing Key (KSK). This is crucial—AWS strictly separates the usage of keys from the storage of keys.
The Parent Zone (The Authority): Usually
.com,.org, or.net. They need to know you are using DNSSEC.
The Tale of Two Keys
If you look closely at the architecture, you’ll see two distinct keys. Understanding the difference is vital for the exam and real-world ops:
ZSK (Zone Signing Key): This key signs the actual records (like your A records and CNAMEs).
The AWS Magic: Route 53 creates, manages, and rotates the ZSK internally. You don’t touch this. It’s fully automated.
KSK (Key Signing Key): This key signs the ZSK. It validates that the ZSK is legitimate.
Your Responsibility: You create this in AWS KMS. You control the permissions and the rotation schedule.
Step-by-Step Implementation Guide
Ready to secure animals4life.org (or your own domain)? Here is the workflow.
1. Create the Asymmetric Key in KMS
DNSSEC requires asymmetric encryption (a public and private key pair).
Go to AWS KMS and create a Customer Managed Key.
Key Type: Asymmetric.
Usage: Sign and Verify.
Key Spec:
ECC_NIST_P256(This is the industry standard for DNSSEC).Note: Ensure this key is in the US-EAST-1 region if you are using a global service, though Route 53 usually supports KSKs in the region where the hosted zone was created (or defaults to us-east-1 for global availability).
2. Enable DNSSEC in Route 53
Navigate to your Hosted Zone. Under the DNSSEC signing tab, select “Enable.”
AWS will ask for the KMS key you just created. Once you link them, Route 53 will essentially “Sign” the zone. It uses your KSK to sign the ZSK, and the ZSK to sign your records.
3. Establish the Chain of Trust (The DS Record)
This is the step most people forget. Just because you signed your zone doesn’t mean the internet knows about it. You need to tell the “Parent” (the .org or .com servers) that you are secure.
In Route 53, after enabling signing, click “View information to create DS record.”
Copy the Key Tag, Algorithm, and Digest.
Go to your Domain Registrar (where you bought the domain—e.g., GoDaddy, Namecheap, or Route 53 Domains).
Look for a section called “DS Records” or “DNSSEC” and paste those values there.
This closes the loop. The Root verifies the TLD (.org), the TLD verifies your DS record, and your DS record verifies your Route 53 KSK.
Inside the VPC: Internal Validation
As shown on the right side of our architecture diagram, DNSSEC isn’t just for public traffic. You can enforce this security inside your Virtual Private Cloud (VPC).
Your instances use the Route 53 Resolver (essentially the VPC +2 address). You can enable DNSSEC validation on your VPC. If an EC2 instance tries to query a domain with a bad signature, the resolver will return SERVFAIL rather than letting the instance connect to a potentially compromised host.
Monitoring: Don’t Set It and Forget It
Security requires observability. If your keys expire or rotation fails, your website disappears from the internet.
Using Amazon CloudWatch, you should set up alarms for two specific metrics highlighted in the architecture:
DNSSECInternalFailure: Something is wrong on the AWS backend.DNSSECKeySigningKeysNeedingAction: Your KSK needs manual intervention (usually rotation).
Pro-Tip: While Route 53 rotates the ZSK automatically, you should schedule KSK rotation (usually once a year) to maintain high security standards.
Final Thoughts
Implementing DNSSEC used to be a resume-worthy badge of honor because of how difficult it was. With Route 53, the complexity is abstracted, but the value remains high. By securing your DNS, you aren’t just protecting your brand; you are protecting every user who trusts your URL.
Have you implemented DNSSEC in your environment yet? Let me know in the comments below!
If you enjoyed this technical deep dive, subscribe for more cloud architecture breakdowns and DevOps tutorials.