
Understanding AWS Network Access Control Lists (NACLs)
From the implicit deny rule to ephemeral ports, this is everything you need to know to configure Network Access Control Lists like a pro.

Hey there, cloud enthusiasts! ☁️⚡
Today, we’re diving deep into a fundamental, yet often misunderstood, component of your AWS network security arsenal: Network Access Control Lists (NACLs)🔒 While Security Groups often steal the spotlight, NACLs are the unsung heroes working tirelessly at the subnet level to control traffic flow. Let’s unravel the intricacies of NACLs and empower you to build more robust and secure AWS environments.
The Foundation: What are NACLs and Why Do They Matter?🚧
Imagine your AWS Virtual Private Cloud (VPC) as a bustling city, and your subnets as distinct neighborhoods within that city. NACLs act as the strict border patrol for these neighborhoods, meticulously examining every packet trying to enter or leave. They provide a crucial, granular layer of security 🧩 that operates before traffic even reaches your instances, making them a powerful first line of defense.
Unlike Security Groups, which are stateful and operate at the instance level, NACLs are stateless⚖️. This is a critical distinction that we’ll explore in detail, but for now, remember that their stateless nature means they treat inbound and outbound traffic as completely separate entities.
🛡️ The Dynamic Duo: NACLs vs. Security Groups 🤖
Before we go deeper into NACLs, it’s crucial to understand their famous counterpart: Security Groups. If NACLs are the imposing fortress walls around your entire neighborhood (the subnet), then Security Groups are the high-tech, personal bodyguards standing at the door of each individual building (your EC2 instances). They work in tandem, but their methods are fundamentally different.
Here’s a breakdown of the Security Group’s playbook:
The Personal Bodyguard (Instance Level) 🚪: A Security Group is attached directly to a resource’s network interface (like an EC2 instance or RDS database). This means you can have two instances sitting side-by-side in the same subnet, each with its own unique set of security rules. It’s the ultimate in granular, resource-specific protection.
The Bouncer with a Perfect Memory (Stateful) 🧠: This is the game-changer. Security Groups are stateful. If you create a rule to allow inbound traffic (e.g., letting a user access your web server on port 443), the Security Group automatically “remembers” that connection. It will permit the return traffic to flow back out to the user without you needing to create a specific outbound rule. This eliminates the headache of managing ephemeral ports for return traffic, making them far more intuitive for application-level access.
The Exclusive Guest List (Allow Rules Only) ✅: Security Groups operate on a “default deny” principle. They start with zero permissions. You can only add “Allow” rules. If traffic doesn’t match an allow rule, it’s dropped. You can’t create an explicit “Deny” rule, which simplifies the rule set to “who is on the guest list?”
Understanding this synergy is key. You use NACLs for broad-stroke rules at the subnet boundary—like blocking a known malicious IP range—and Security Groups for fine-grained, stateful control over your individual applications. Using both isn’t redundant; it’s a world-class, defense-in-depth strategy. 🧱✨
📦Default NACLs: Your VPC’s Starting Point
When you create a new VPC, AWS automatically provisions a Default Network Access Control List for it. This default NACL comes with a very permissive configuration, designed to ensure that you can initially connect to your resources without immediate connectivity issues.
Default NACL Rules
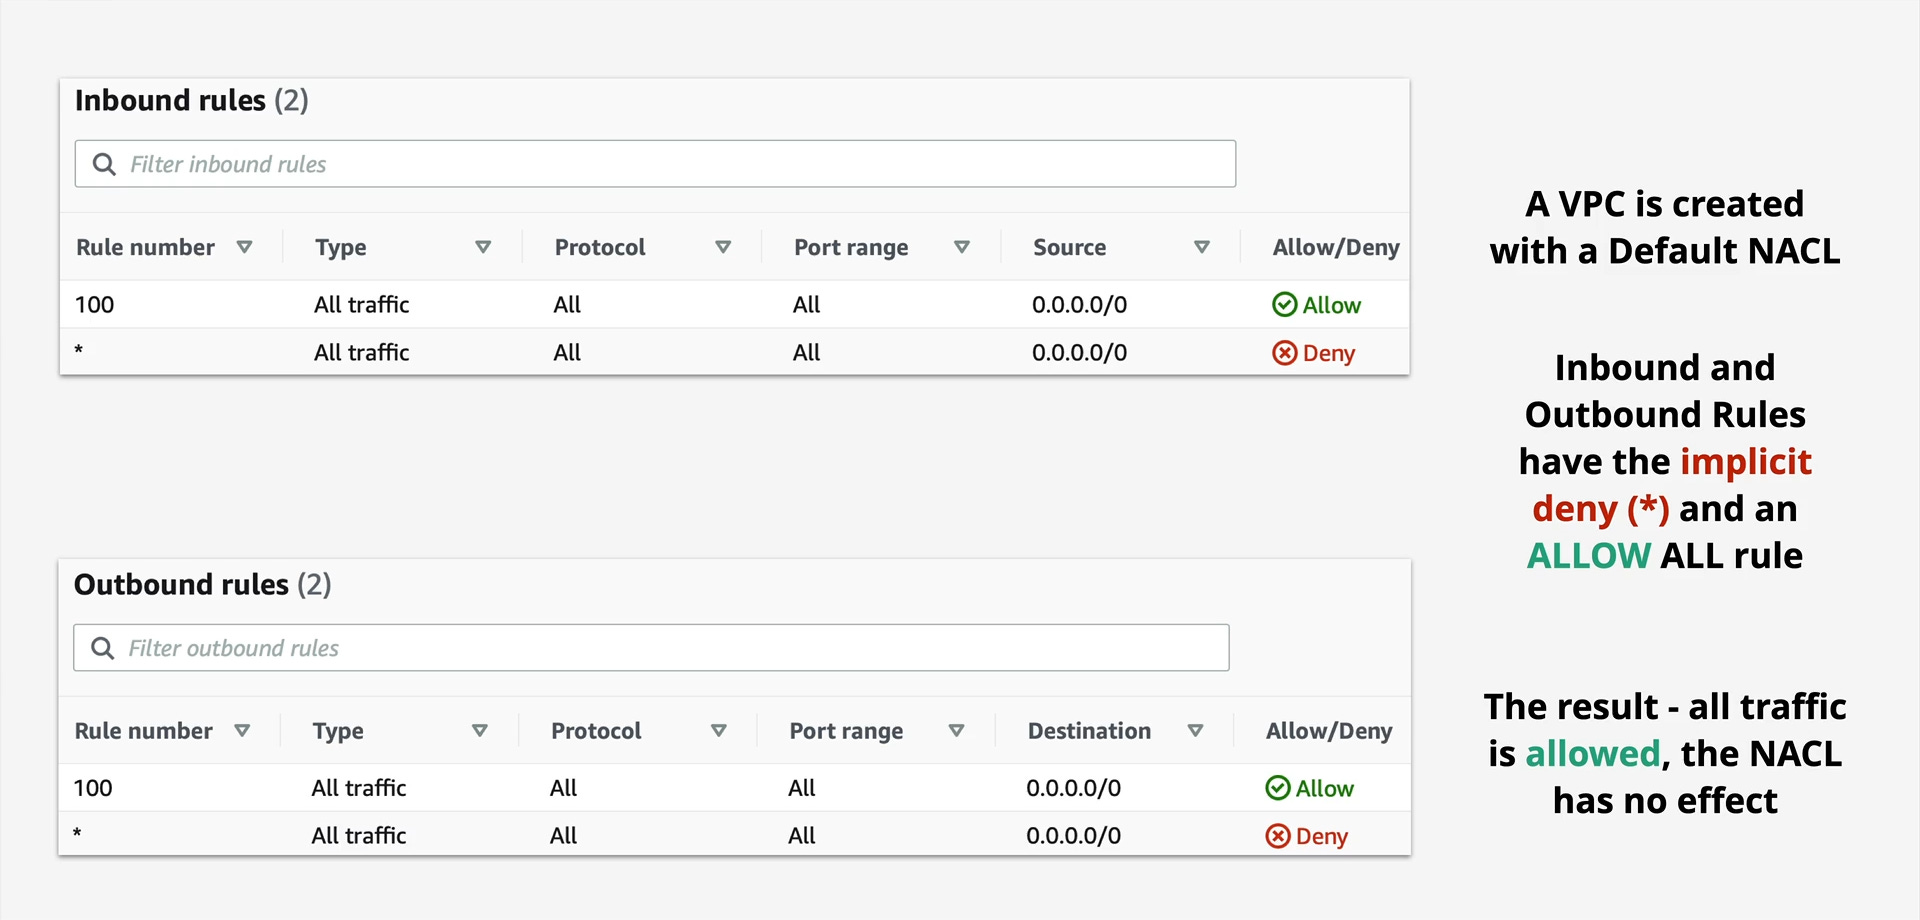
As you can see, both the inbound and outbound rules include:
Rule 100: ALLOW All Traffic (0.0.0.0/0): This rule explicitly permits all traffic on all protocols and port ranges from any source (inbound) or to any destination (outbound).
Rule * (asterisk): DENY All Traffic (0.0.0.0/0): This is the implicit deny rule. It acts as a catch-all, denying any traffic that doesn’t explicitly match a preceding allow rule.
Because Rule 100 allows everything, the implicit deny rule in a default NACL essentially has no immediate effect. All traffic is initially permitted, providing a blank canvas for you to refine your security.
Stepping Up Your Game: Custom NACLs
While default NACLs are a convenient starting point, relying on them for production environments is like leaving your front door wide open. This is where Custom NACLs come into play. When you create a custom NACL, it starts with a much more restrictive posture:
Custom NACL Default Rules
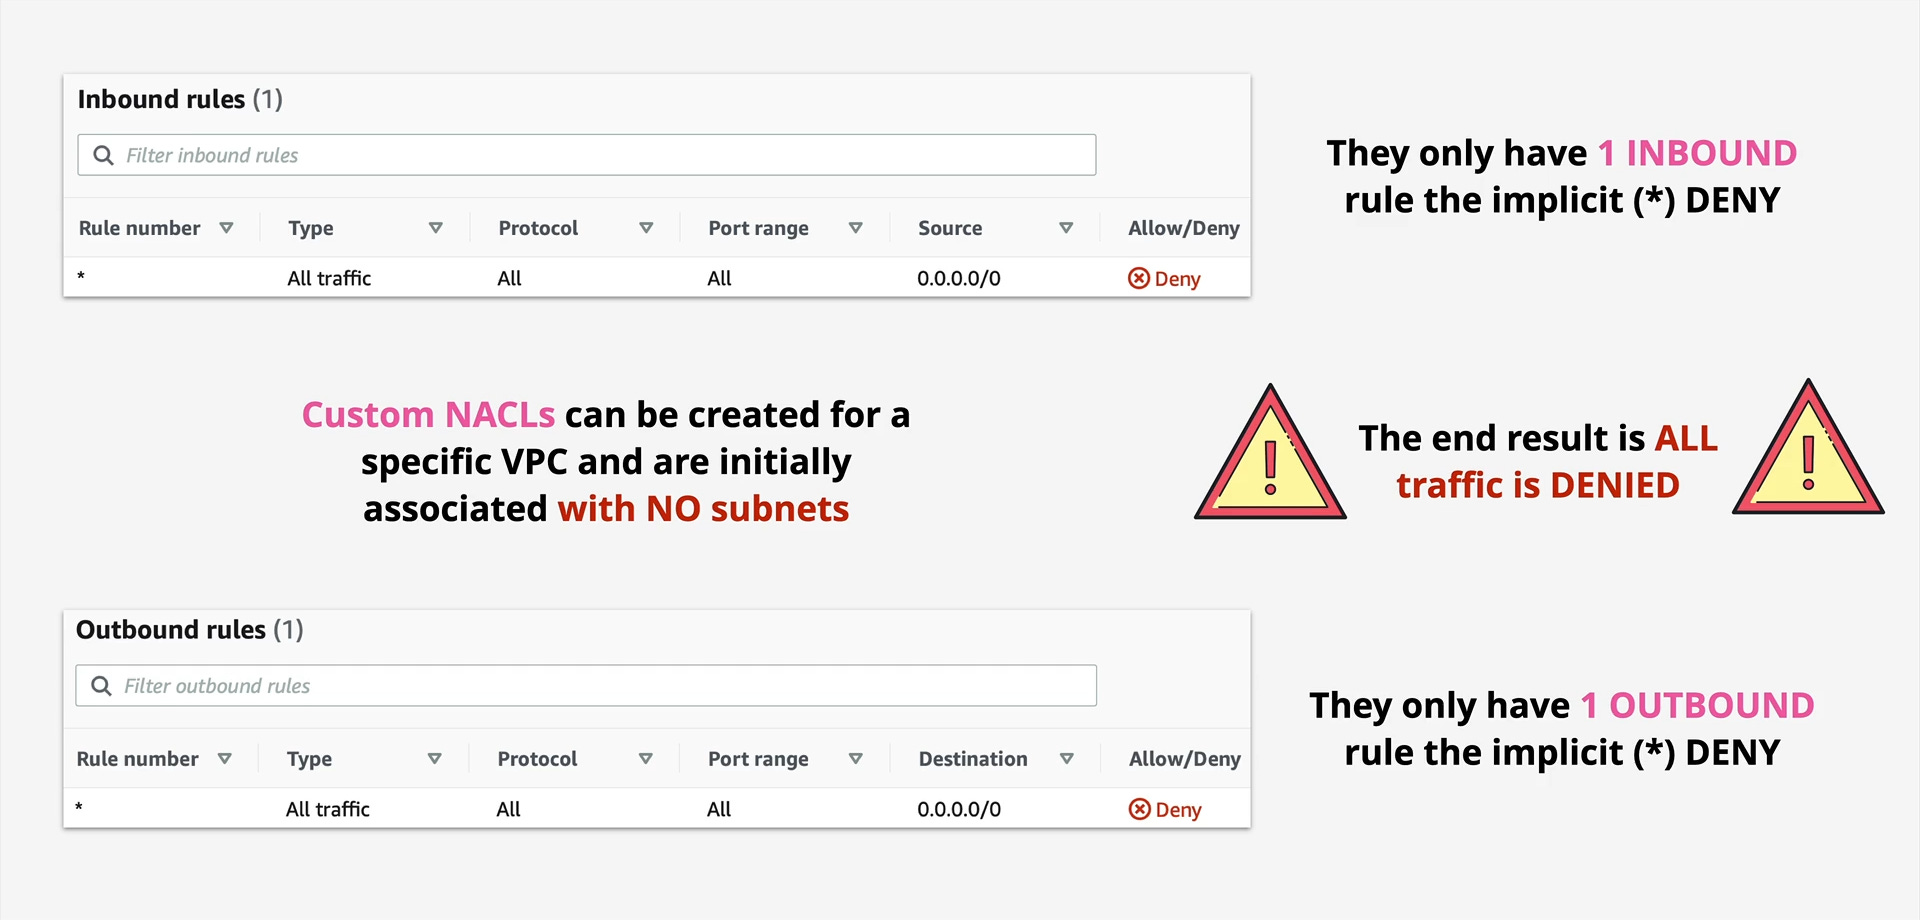
Notice the key difference: a custom NACL starts with only the implicit deny rule (*). This means that all traffic is denied until you explicitly add rules to allow it. This “deny by default” approach is a cornerstone of robust security and is highly recommended for any production-grade subnet.
Important Note: A custom NACL is initially associated with NO subnets. You must explicitly associate it with the subnets you want it to protect.
The Stateless Nature of NACLs: A Deep Dive
This is perhaps the most crucial concept to grasp when working with NACLs. Unlike Security Groups, which automatically allow return traffic for any established connection (they are “stateful”), NACLs are stateless.
What does this mean in practice?
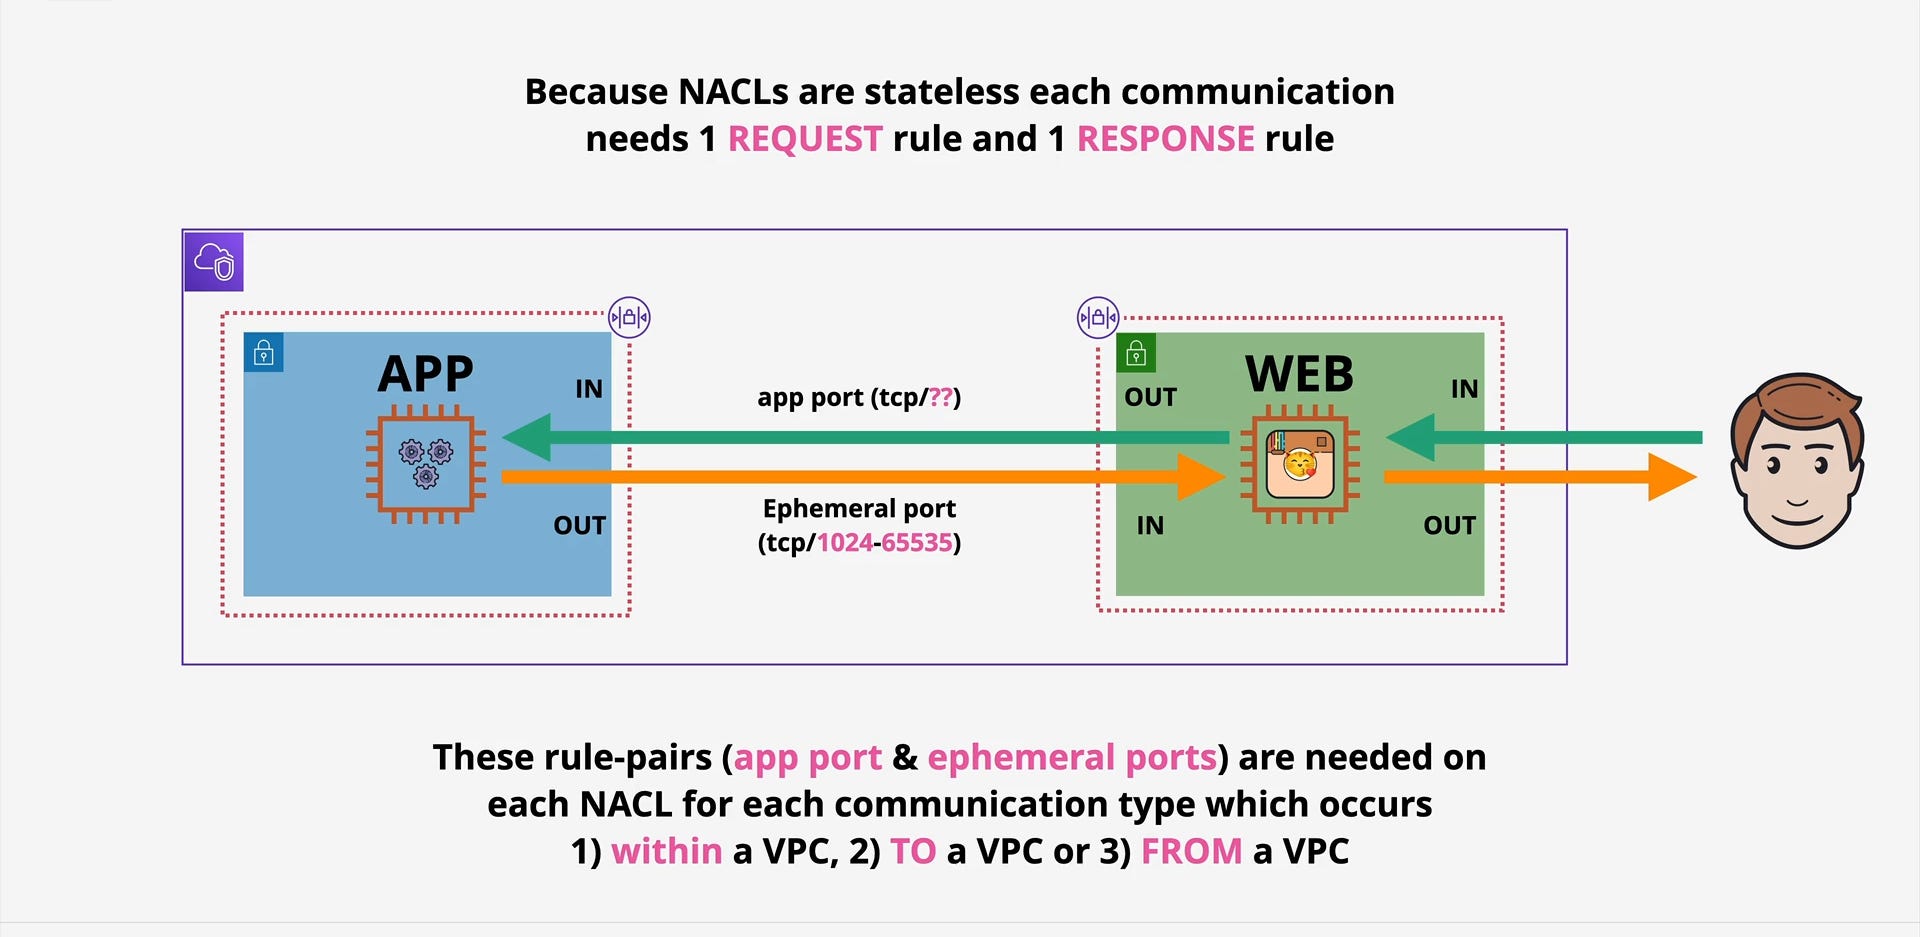
It means that if you allow inbound traffic on a specific port, you must also explicitly allow the corresponding outbound response traffic on ephemeral ports. If you don’t, your connections will likely fail, as the return packets will be blocked.
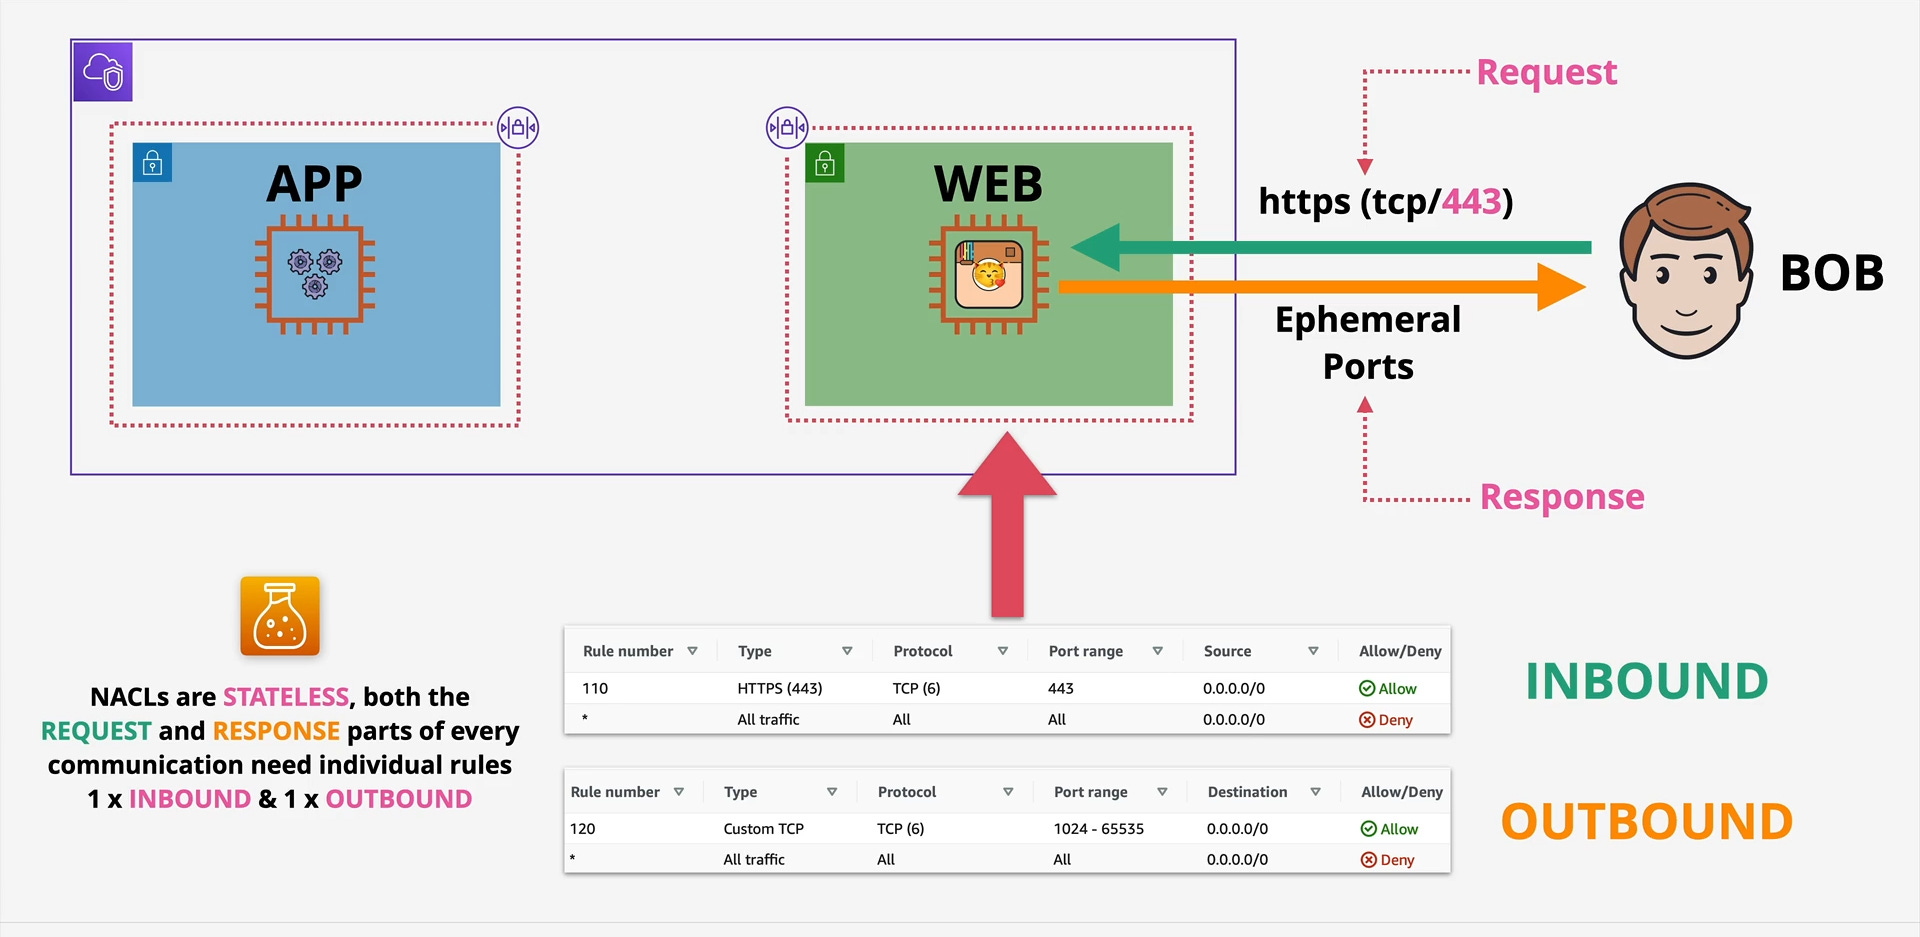
Consider “Bob” trying to access a web server in your VPC over HTTPS (TCP/443).
Inbound Request (Bob to Web Server):
Bob sends a request to the web server on port 443.
Your NACL needs an inbound rule allowing TCP traffic on port 443 from Bob’s IP range (or 0.0.0.0/0 for public access).
Outbound Response (Web Server to Bob):
The web server processes the request and sends a response back to Bob.
Crucially, this response will originate from the web server and go back to Bob on an ephemeral port (typically in the range of 1024-65535, though some client OSes use higher ranges).
Therefore, your NACL also needs an outbound rule allowing TCP traffic to ephemeral ports (1024-65535) to Bob’s IP range (or 0.0.0.0/0).
Without both an inbound rule for the request and an outbound rule for the response, the communication will fail! This stateless behavior demands meticulous attention to both directions of traffic flow.
Rule Processing and Ordering
NACLs process rules in numerical order, from the lowest rule number to the highest. The first rule that a packet matches is applied, and then processing stops. This means that the order of your rules is absolutely critical.
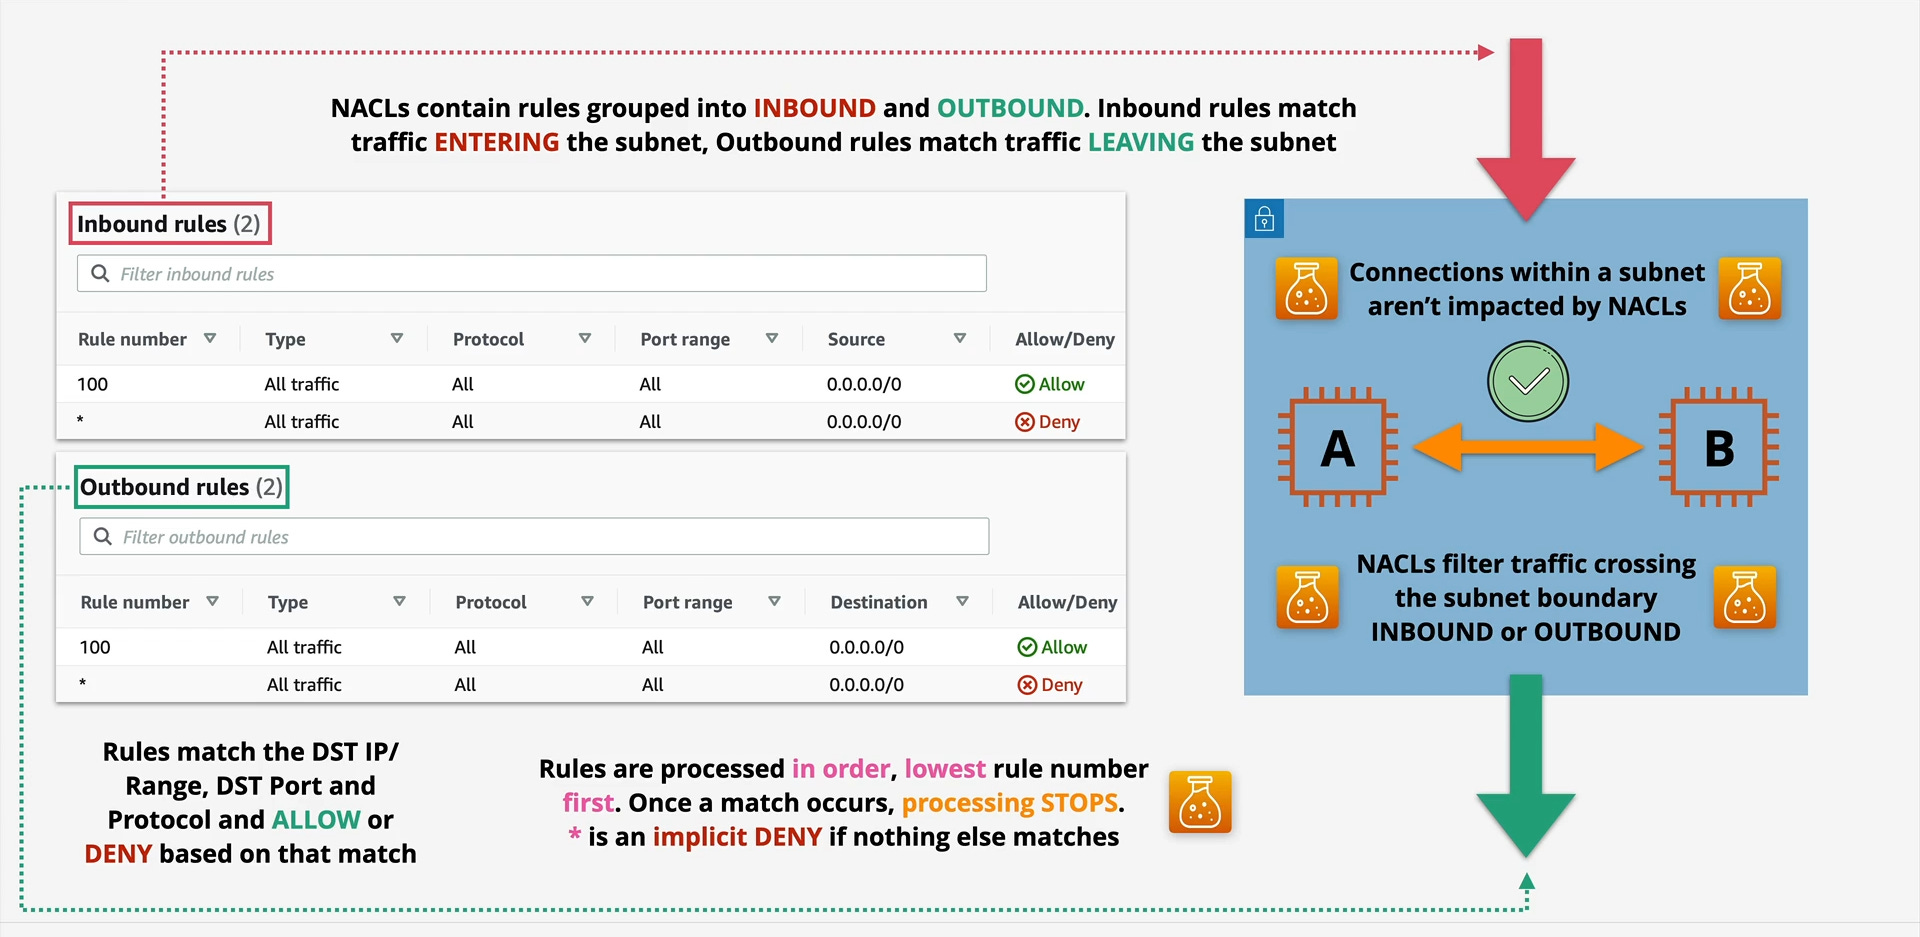
Start at the lowest rule number: NACLs begin evaluating rules from the smallest positive number (e.g., 100, 200, 300).
Match and Act: If a packet matches a rule (based on protocol, port range, and source/destination), the specified action (ALLOW or DENY) is taken, and rule processing stops.
Implicit Deny: If a packet doesn’t match any of the explicitly defined rules, the implicit deny rule (
*) at the end of the list automatically denies the traffic.
This ordered processing is why you often see more specific DENY rules placed before more general ALLOW rules, or vice-versa, depending on your security strategy.
Where Do NACLs Fit in the Security Picture?
NACLs operate at the subnet level, meaning they filter traffic entering or leaving an entire subnet.

Key takeaways here:
Subnet Boundary: NACLs filter traffic crossing the subnet boundary. This includes traffic from the internet, other VPCs, or even other subnets within the same VPC.
Intra-Subnet Traffic: Connections between instances within the same subnet are not impacted by NACLs. For internal subnet communication, Security Groups on your instances are the primary control.
Best Practices for NACLs
Deny by Default with Custom NACLs: Always use custom NACLs for your subnets and start with a “deny all” approach. Explicitly allow only the necessary traffic.
Granular Rules: Be as specific as possible with your rules. Avoid overly broad
0.0.0.0/0allowances unless absolutely necessary and for well-understood reasons.Remember Statelessness: Always define both inbound and outbound rules for every desired communication path, paying close attention to ephemeral ports for return traffic.
Order Matters: Carefully plan the order of your rules to ensure your intended security policies are enforced. Place more restrictive rules (like specific DENY rules) before more permissive ALLOW rules.
Smallest Possible Rule Numbers: Use rule numbers in increments (e.g., 100, 200) to allow space for inserting new rules later without renumbering everything.
Layered Security: NACLs are one layer. Combine them with Security Groups, VPC Flow Logs, and other AWS security services for a comprehensive defense-in-depth strategy.
Conclusion 🧱
NACLs are a foundational element of network security in AWS. While their stateless nature can sometimes be a head-scratcher for newcomers, mastering them provides an invaluable layer of control over traffic flow at the subnet level. By understanding their behavior, rule processing, and best practices, you can fortify your AWS environments and ensure that only the intended traffic reaches your critical resources.
So, go forth and configure those NACLs with confidence! Your secure AWS infrastructure will thank you.
If you have any questions or want to share your NACL experiences, drop a comment below!